Tuesday, 20 August 2013

Drawing the Curtains on Fugly Home Decor

    I was just going through some of my photos and I came across these beauties. I had taken these specifically for a post about making my own curtains, that apparently I never got around to writing. You may recall about a year ago I wrote a post about my new house and all the work that needed doing to get it to look like my husband and I lived in it as opposed to a tramp from the 60's. My first big task was curtains, because the ones we had were pretty fugly and really didn't even work that well.
    I tackled the master bedroom first, because that's where we sleep (obviously) and needed some morning light blocked out. I had (and seem to still not have) any money to purchase curtains, I couldn't find any that I liked anyway, and I couldn't even really find any fabric that I fancied (Sheffield is short on good fabric shops as far as I can determine). So, being the spendthrift, DIY, crafty sort of person that I am, I bought myself some super cheap king-sized flat sheets from Wilkinson's (one in light green and one in teal) and cut them both in half, sewed them together (green on one side, teal on the other) folded the top over till the length was where I wanted it (just touching the floor) pinned and sewed in my loop for the curtain rod and voilĂ ! My awesome two-tone bedroom curtains, which do a fairly decent job of blocking out the sunlight and peeping neighbours and match the rest of my bed linens fairly well.
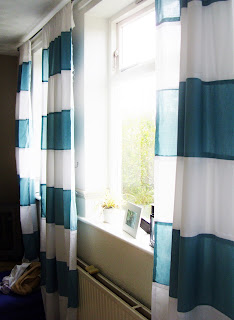
    Next it was on to the three windows in our lounge. I knew I needed two sets of curtains for these (the middle window is larger then the other two) and I wanted floor length with fat horizontal stripes. Checked everywhere for these, couldn't find them for sale anywhere in the UK (including online). But i did find a couple tutorials on how to make my own, which seemed a bit complicated, so generally I ignored them and made it up as I went along.
    Again, straight to Wilko's for cheap sheets, I had to get four this time, two teals and two white's. There was a bit more measuring and math to do as well to sort out the width of my stripes and how many panels I could get from each sheet without wasting material. In the end I made a cardboard template so that each stripe would be exactly the same and once the panels were cut I trimmed off the seam allowance from my template to help make sure that my stripes all came out even and straight as I pinned and sewed them together.
    So once the panels were sewn together I hemmed them all around and again used my curtain rod to help me find the right length, pinned and sewed in a loop. Now at the time I didn't have the spare change for extra white sheets to do the lining on these, so I just left them semi-transparent, which is fine because we don't hang around naked in our living room, or try to sleep in there (although sometimes a nap happens). But someday in the near future I will go and get a couple white sheets, half them down the middle and line these bad boys. Probably just unpick my curtain rod loop seam, add the lining sheet, then sew them both back up along the old unpicked seam again. Anyway, whole project cost me less than £20 for the four curtains, which is mega savings when I could have ordered something similar for four times that amount! Pretty awesome I think.

Saturday, 17 August 2013

Lemon Curd

    Today I was very brave. I made Lemon Curd. I had heard (on my many jam related searches on the internet) that lemon curd was really difficult, people said that their curd went lumpy and curdled or didn't set at all, that it tasted funny, turned a gross colour, you name it it seemed like it happened. In fact The Curd has a bit of an online reputation of being a real challenge. So I avoided it, I mean it has eggs in it, so I figured it had to be difficult, I'm used to standard issue fruit and sugar preserves, eggs just complicate things.
    But on a trip to Bolsover Castle (a weekend adventure with my hubby) a free sample of local Lemon Curd was on offer and I tried some and it was tasty and I immediately desired a jar or two for my fridge. It was a bit of a gross day outside, perfect weather for slaving away in the kitchen, so when we got home I decided I would check my Jam Book for a recipe and obviously there was one, because there's a recipe in this book for just about everything (including kumquats). Tom graciously agreed to drive me up to Tesco for supplies and even handed over £5 for the Curd cause.
    I took a deep breath and decided I had better follow all the directions exactly (I seem to have a hard time doing this). I even purchased enough supplies for a second attempt, convinced I would fail the first time. Here's the recipe I used:
Lemon Curd
Note to self: get one of those juicer things where
the bottom attaches to form a bowl.
2/3 cup lemon juice - filtered, no bits floating around in there and the zest of 1 lemon (optional)
1 cup sugar
6 Tbsp unsalted butter
2 eggs
2 egg yolks  
    The recipe suggested that although you can make lemon curd in a saucepan, a double boiler was suggested to make sure it cooked more evenly. so I set up a makeshift one with a saucepan of simmering water and a glass bowl that fit nicely inside it. I melted the 6 Tbsp. of butter in the glass bowl.
    While the butter melted I beat (technically I suppose I whisked, since I used a whisk) the eggs and egg yolks till they were smooth then added in the lemon juice and mixed this until it was smooth.
    Back to my butter on the double boiler, once it was melted I added the sugar gave it a stir and then stirred in the lemon and egg mixture. I carried on stirring this mix over medium-low heat for about 5-10 minutes until it thickened. The test was to dip a spoon in the mix then draw a line across the back of the spoon. When the curd holds the line and doesn't infill it then it's done (also I checked it was a thermometer, 160 F). You can add in the lemon zest at this point if you want, I did. Then it was into some jars, lids on, labels and left to cool for a bit before they went into the fridge.
The finished curd, yum!
    And, guess what, it really was that simple! No curdling, no failure to set, it's still very much yellow and it tastes like Lemon Curd! So I'm not sure where all these chat room sorts are going wrong, unless the secret really is the double boiler method. I can see how a regular saucepan might cause some problems, you'd have to really work hard to regulate the temperature and make sure it cooked evenly. But altogether it took me about half an hour and it was one of the cheapest preserves I've managed to date, less than £5 and I still have enough supplies left to make a second batch!. I got three small jars of curd from this recipe and it tastes lovely, although I did have to make a batch of scones quickly so I could test it out.
    So if you've been avoiding the Curd challenge because you too have been intimidated by it's online reputation as being a difficult beast to master, I strongly encourage you to have a go at it, it's not so scary after all.

Thursday, 8 August 2013

Tayberry Jam

    So a couple weeks ago I visited my friend's PYO in Hartley Wintney, Hampshire, West Green Fruits. There I discovered a entire section dedicated to hybrids (crosses between blackberries and raspberries). After diligently trying each type of hybrid berry I settled on the Tayberry. Named after the River Tay in Scotland, these berries were created by Derek L. Jennings of Dundee in 1979. They were sweet and fragrant and basically just tasted awesome. I had intended to get some boysenberries or loganberries, but the Tayberries were just so much nicer that I couldn't resist. I picked about a kilo (one heaped full punnet) and gladly paid for my spoils. As I wasn't at home I had to wash and freeze my berries at my in-law's so they would keep until I got home. I wouldn't really recommend this, as it makes the berries go all mushy and messy when they thaw. But since it's a four hour drive from Hampshire to Sheffield and we don't have AC in our car, it was really my only option.
    Once I got home I got out my jammy bible and had a sift through it, hoping to use a recipe for Boysenberry Jam, but to my dismay I didn't find one! I could tell you how to make jam out of all sorts of strange and wonderful things, but hybrid berries are not given their fair due in my Jam book. So I had a quick flick through the recipes for Raspberry and Blackberry Jam. You would think these would be almost identical, but they're not, blackberries have much more natural pectin then they're red cousins, so less lemon juice and sugar are needed for the jam to set than with raspberries. I decided to get creative and use a combination of the two recipes to sort out my Tayberries. turns out I got it about right, the jam set and tastes good anyway. Here's my recipe.
Tayberry Jam
1 kilo (32 oz / 2.25 lbs) Tayberries
2.5 cups sugar
2 Tablespoons Lemon Juice
    I started by washing the berries and making sure all the bits of leaf and stems and bird muck was all of them. I usually do this in my pasta strainer under the running cold tap. Once I wash them I weigh them, to see how much sugar I need. Since I sort of made this one up as I went along it was lucky I had exactly a kilo of fruit, otherwise the recipe would be really hard to convert for larger quantities. Then it's into the pot they go with the lemon juice and sugar.
     I cooked them gently on medium heat and gave them a mash with my hand potato masher just to break them up a bit. Now, I like my jam seedy, I think it's a nice texture and adds a little flavour, but if you don't like seeds then you'll definitely need to strain these berries. So instead of adding in the sugar and lemon juice straight away, gently cook the berries to soften them, mash them up and then pass them through a food mill or course strainer to get rid of the seeds, then add the sugar and lemon juice.
    Then it's pretty much like any soft fruit jam process. Cook gently until the sugar completely dissolves and then turn up the heat and bring to a boil. Stir it almost constantly so you don't get any sticking to the bottom of the pot and burning. Keep doing this till a drop of the jam mounds or skins over on a chilled dish. This took about 15 minutes in my case, pretty similar to raspberries, nice a quick. pour the jam into some sterilised jars and pop on the lids, let it set at room temperature for a few hours and it's good to go.
     I got three smallish jars of jam for my kilo of berries, so total cost per jar would probably have been somewhere around £1.80 per jar, not too shabby if you ask me. And let me tell you, this stuff tastes so good it might just put you off any other jam forever. My house smelled so good while I was cooking it that my husband came down begging to let him try some (he couldn't, it was boiling hot, I did let him have the spoon when I finished though). And the taste is heavenly, it has the texture and sweetness of blackberry jam, the acidity of raspberry jam and an aroma almost like a rose or a really sweet ripe citrus fruit. it is definitely my new favourite. We've been trying really hard not to just eat it straight from the jar by the spoonful!
    Needless to say I'll be back at West Green picking these berries again next summer. I wish we lived closer so I could go back for a couple more punnets straight away, we'll have to ration our three jars to make them last all year. I'm also excited to try some of the other hybrid berries they have and see how they turn out in jams, and if they taste significantly different or not. Based solely on my pre-picking taste tests, I think there's a lot of potential for some amazing flavours.


Wednesday, 31 July 2013

Pick Your Own

Last week (on Thursday to be precise) I visited West Green Fruits, this is a pick-your-own (PYO) in Hartely Wintney (North Hants) near where my in-laws live (I've been helping them move house, so I was down there for a week or so). Anyway, West Green is owned and operated by the parents of a friend of mine and so a bunch of us converged on the PYO on Thursday.
This was my first visit to West Green, and I was really impressed. It's HUGE! And the selection of fruits available was phenomenal. I don't have any pictures, I was too busy picking to snap any, but check out their Facebook Page for pics, updates and loads more! I took David, my father-in-law, along with me and together we managed to pick a punnet of Tayberries, another punnet of a mixed variety of hybrid berries (crosses between raspberries and blackberries) and a punnet of strawberries. I ate a fair few as I picked, they were all so tasty. In fact the whole place smelled of ripe strawberries, and let me tell you, they tasted of heaven. 
I also helped some friends pick raspberries and we went through the grass and barley mazes with our smaller friends Josh and Charlie. Prices were really good, around £4.80 a kilo (my two punnets cost me around £8.50) and the fruit quality was top notch.
So if you live in the Hampshire/Berkshire/Surrey area and are looking for some brill fruit, check out West Green Fruits!
I've also turned my strawberries and Tayberries into jam (along with some gooseberries that I got from my in-laws back garden) so posts to come all about that!

Tuesday, 16 July 2013

Rubbish to Riches: My Bedroom Mirror

My in-laws are moving/downsizing and as hubby has been away from home a lot this summer on research trips/conferences for his degree, I've spent a lot of time with them clearing out the cupboards. I've 'inherited' some brilliant stuff (a full china tea set and espresso set, a cake stand, a bunch of books and movies) and I've spent a lot of time helping them get rid of junk. Junk means trips to the tip (that's the garbage/recycling center for you Americans out there). And a couple weeks ago I went with my father in law to the tip to get rid of some junk from the shed in the garden.
The before shot. I got a bit excited about painting
and forgot to take a picture of it before I started.

Now the tip where my in-laws go has a little shed for unloved items that might still be useful, let's call it the 'one man's trash is another man's treasure' shed. And there, amongst worn picture frames, sofa's from the 60's and a couple retro looking sideboards, I found this mirror. Now we've needed a large mirror in our house for a while, I've not been able to see a full outfit on myself for almost a year now; we left the full length we used to have in Lancaster, I did a really good job putting it on the wall and decided that getting it off again was not worth the £10 it had cost me at Ikea. Anyway, no mirror means some dodgy outfits and also no way of seeing if I look fat or not. Result, lots of chubby pictures of myself floating around Facebook.

So this mirror came into my life, I saw it, I recalled my need for a large mirror in our bedroom, I realised that I had forgotten to bring my wallet (who brings a wallet to the tip right?). I consulted my Father-in-law and asked if he could spot me a couple quid for this mirror, he checked his wallet, £1.50 and a handful of euros (he'd just gotten back from a trip to France). We went in search of the tip man to do some haggling, he said he wanted £3 for it, we said we only had £1.50, but we had a bunch of Euros. We offered him 6 euros for it, and somehow, magically, he agreed! The mirror was mine!

Finished mirror, hung up in the bedroom.
Now what do do about the hideous purple colour (which it became clear was also not the original colour, it appears to have at one time been faux oak or beech, but may have at some point been painted a goldenrod colour and originally may have been metallic, I really don't know, I didn't dig that deep. I didn't have a ton of cash to spend on this thing, I was sort of in trouble for getting it in the first place. But last weekend my husband very kindly agreed to drop into the hardware store so I could purchase some paint and a brush to carry out my mirror makeover. I decided on a paint sample in the teal colour that we seem to like so much at our house. This cost me a whopping £1.10! I originally had opted for spray paint, but man that stuff is expensive! And I bought a paintbrush for around £3.50. That and the current exchange rate on Euros means the whole thing came in at under £10!

I got home, dismantled the frame from the mirror and took it outside. It took two coats of the paint to cover over the purple, but as it's a heatwave in England right now, it dried in under and hour. While the paint was drying I gave the mirror a good clean, removed the remnants of dried on purple paint (whoever had DIY'd it previously hadn't bothered to remove the mirror from the frame first), and gave it a good wipe down with window cleaner. reassembled the frame, moved the brackets around on the back so i could hang it vertically, and with a nail in the wall voilĂ !  Fantastic mirror for less than a tenner that looks like £50. Just goes to show, you never know what you can find at the tip... or something like that.

Tuesday, 29 January 2013

Mince Pie Madness

I know, the holidays are well and truly over, so call me crazy for sharing all my holiday stuff now. But i have some time on my hands today and I starting going through our cameras and importing all our pictures from the past couple of months and discovered a lot of forgotten photos that I had taken with the intention of writing a post and amidst the bustle of the holidays I didn't get around to it. So I was going to do a post today about ideas for keeping warm in the coldest months, but I'm going to put that one on hold and share some of the fun I got up to over Christmas instead.
In the months leading up to Christmas, one of our favourite weekly programs is The Great British Bake Off. It always gets me and hubby wishing that we could bake something, and with Christmas approaching we saw our chance to have our of bake off at home. We decided that we wanted to make our own mince pies, but we couldn't agree on a recipe, so in order to avoid an argument and have a little fun, we decided to have a competition to see who could make the best mince pies. We chose our recipes in secret and purchased our ingredients (and a bun tin) and set to it. I chose a Mary Berry recipe (I figured she's the baking queen, so it would be a sure advantage. Tom chose a recipe with rum in it, because he likes rum and any food with rum in it must be better for it in his view. We set to work, albeit in our chosen forms of sleepwear ( I promise he's got boxers on under that apron). The results were probably not Mary Berry and Paul Hollywood standard, but both were tasty (mine were best in a totally unbiased taste test conducted by myself) and we ate them so fast that no one else got to try any. Mostly though it was just a good messy bit of holiday fun. I think we may make it a holiday tradition and do it every year.
Another holiday baking tradition that I have carried on from my family back in the states is making Christmas Bread. My mom makes this every year and we have it for breakfast on Christmas morning. I come from a family of six, so a large loaf is required to see us all through till dinnertime, so this thing is huge. It's an enriched  sweetbread made with eggs, milk and sugar with aniseed mixed in for flavouring, a Greek recipe in origin I believe (thus the cross at the top). I can't ever get it to rise quite right, but this year was my best attempt so far, i managed to get it cooked evenly all the way through and it sure was tasty.
On the crafting front I didn't do much this year, we were so busy in the build up that I just didn't manage to get around to it. But I will share one of my favourite crafted items that I dig out of the Christmas box every year. My grandma knits, it's something she's done as far back as I can remember, I don't know what it is she knitted most of the time, but she'd sit down and watch tennis or wheel of fortune and get out her needles and click away. Now whenever there is a new addition to the family (be it by birth or marriage) she knits them a Christmas stocking, complete with their name on it so they don't get mixed up. Grandma and grandpa have them, my parents have them along with all my aunts and uncles, cousins, siblings and now my husband has one too. This was the first year that we actually had a fireplace to hang them on. I think they are one of my favourite decorations because they're not just a decoration, they're a bit of my family that I will always have, even when I don't get to spend time with them over the holidays.
We have a handful of other Christmas traditions, but as we do them every year, I think I'll save those for another Christmas post in the years to come.

Tuesday, 6 November 2012

New Beginnings Part 1: Downstairs

Hi all. My little sister reminded me the other day that I had been decidedly quite on the blog for the past couple months. I'm not dead, I promise. We just moved, so I've had a lot going on.

That's right, we have left behind the lovely Lancaster for the much busier Sheffield. Tom has started his PhD in Volcanology at the University of Sheffield and I am once again playing the housewife while I wait for a visa application to (hopefully) turn into a visa so I can find a job. But in the meantime I'm keeping busy with our new house. Given the post move budget (which has been very tight) I have more ideas then actual projects, but I have been getting up to a couple things, so more posts in the near future. But today I thought I'd just reach out for some help and inspiration and share a bit of the new home with you. This will probably be a three part series, we have a lot more space inside and out. But the downstairs is the part we spend the most time in (at least in the coming winter months) and it's the first two rooms I want to tackle (as well as the ones that are giving me the most trouble).

I'll start with the lounge, and curtains. this is the bane of my current existence. I have searched high and low for some contemporary and stylish curtains to cover the three windows in our lounge (and replace those hideous blue ones), but to no avail. I have scoured several of the Sheffied fabric shops looking for fabric to make my own curtains or roman blinds and I've come up trumps every time. I'm still trying to decide what I really want I guess, I thought about doing some roman blinds with a fun print, but then I thought maybe I should do regular curtains because they're easier to make. I considered a combination of the two. I know I want to add some colour to our drab grey lounge, but I'm not looking for a boring solid, but a print might be too busy with an entire wall essentially windows. Really what I want is a nice think stripe. I've found some inspiration online recently for some DIY thick stripe curtains that I like, and I might actually be able to afford, now just to decide which colour I want and find some sheets to fit the bill.
I like these stripes.
Lounge colour scheme?

I really like the pattern on these and I found a great DIY tutorial online at Craft Interrupted. She outlines four ways she found to achieve this look, but I think I'd go with her choice and buy a couple sheets and piece it all together myself. Still a bit iffy about colour choice, I have some thoughts on using Scandinavian themed colours in the lounge, keeps it simple yet bright. I like the mix of lime, teal and blue (we have a bit of that going on already) and the dash of orange to brighten it all up a bit. We have shades of grey instead of brown in the lounge, but I think it might still work. I'm considering cream and orange stripes. Either way a trip to Wilkinson's for cheap sheets is in order. A lot of sewing ahead for me.
My other challenge in the lounge lies on the opposite wall, that big blank one on the left. I want to do a really great montage of photos and things on the wall, I have three collage style frames already, but I think they may look a bit sad all on their own. But I must get something up there, so it's that or nothing at the moment. I also have the mantle to do something with. I find this one a bit daunting because the mantelpiece is firstly so low, secondly so narrow, and thirdly I have that beast of a 1960's gas fire to contend with! As Christmas is coming I'm waiting to tackle this project for a couple more weeks, then I can do a Christmas display and hopefully inspiration for after the holidays will come to me. I think more to come on this in future Christmas related posts.
Something like this only hung horizontally.
Finally we have the kitchen, which is much bigger then our last house, we even have room for a table this time (which we don't use a great deal, but it's there). We have one big bare wall in the kitchen as well, which doesn't bother me as much as the lounge because there's a lot less empty space in there. In fact I'm almost worried about hanging anything on this wall because I'm afraid it might give the kitchen a cluttered feel. So i think whatever goes here will have to be very simple. I've thought about perhaps finding some printables or images of herbs or veggies from an old book and framing them simply. But I think by far my favourite idea is to find an old window frame and hang it. Now I don't think I would put photos behind, it would make the room too busy, but I like the idea of a mirror, or perhaps a subtly textured print of fabric or paper in a contrasting colour to the wall. But I don't have a friendly neighborhood salvage yard, so where I might find some of these gems is a question I have yet to answer.
That's it for part one I'm afraid. But there is much much more to come. I love crafting during the holidays, and I have several projects under way for Christmas as well as some fun stuff by way of baking to post about this week. So it's going to get busier around here!